This introductory section will teach you the bare minimums to get started with WAF.
Installation
Make sure you got:
- A Windows PC with .Net 4.5.1 or later
- Visual Studio 2019 (older versions work as well)
- MS SQL Server, MS SQL Server Express, PostgreSQL or MySQL
- Download and run WAF.Setup.exe from www.webnodes.com/download
- Run the WAF.Setup program and click "Install"
- Follow the setup wizard in your browser and select the “The WAF framework site” which is an empty WAF installation.
- Select to install on "Local Machine"
- If you need help installing Relatude, see the installation section for more detailed information.
Editing content
- Type “relatude” after the root URL of the website. This will take you to the Relatude interface.
Use the master login you specified during the setup. WAF works well with all modern browsers
- Maximize the browser window.
- Open the preview by clicking on the “Preview” button on the top right corner.
- Select one of the articles in the menu and click “Edit” at the top.
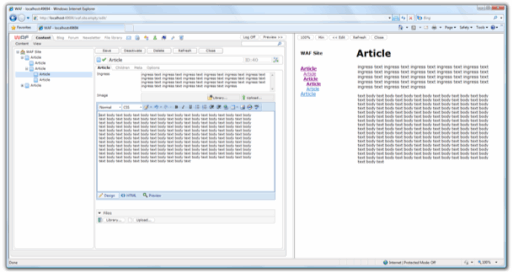
This will open the page in WAF and your interface should look like this:
Things to try
- Upload images by clicking on the “Upload” button in the “Files” field below the blue editor.
- Select a range of images from your hard drive and watch WAF upload multiple images in one go.
- Once the images are uploaded you can insert them into the editor using the image icon on the editor toolbar.
- Once an image is inserted in the HTML field you can edit it by right clicking on the image.
- Upload a video and insert it using the media icon in the editor
Making your own templates
MVC:
- Create a controller called TestArticleController, with an index view. In the view set ArticleBase as the model. To fetch the current article in the controller write:
var article = WAFContext.Request.GetContent<ArticleBase>();
- Create a new MVC template called TestArticleTemplate. Set the route name to "WAFNode", controller to "TestArticle", and address to "address". Then add the ArticleBase contentclass to content classes.
- Create a new Article-content, and set its template to use TestArticleTemplate.
Requests to the article will now use the controller and view that you have defined.
Aspx:
- Create a new template file call Article2.aspx under the folder “Templates”. Make it use the master page “Main.master” found in the same folder and set the language to C#:
- Take a look at the Article2.aspx file
Once you have created the .aspx file you create a template instance in WAF that refer to this file.